Planned Production
Planned Production allows users to configure the production hours for each machine in a tenant. A production schedule can be applied for each machine individually at half hour intervals. The schedule can be set once or set as a recurring schedule, however, manually scheduling each day is recommended.
Important
Making changes to a recurring entry will apply those changes to every entry in the series. This includes all historical and future entries. Do not make changes to recurring entries unless those changes apply to every entry.
Users can use Planned Production to identify any breaks or planned downtime in the machine's schedule. When Planned Production is enabled, a schedule must be added or the availability score's accuracy will be impacted in PackNet Report. Without setting a Planned Production schedule, PackNet applies a 24-hour production schedule to availability scores, whether the machine was producing or not. All PackNet Report dashboards apply Planned Production schedules to their scores unless the switch on the top of the dashboards is turned off. Turning the Planned Production switch off for one dashboard turns it off for all dashboards.
Note
Planned Production requires PackNet Report for this feature to work.
Planned Production is found under the Configuration tab.
 |
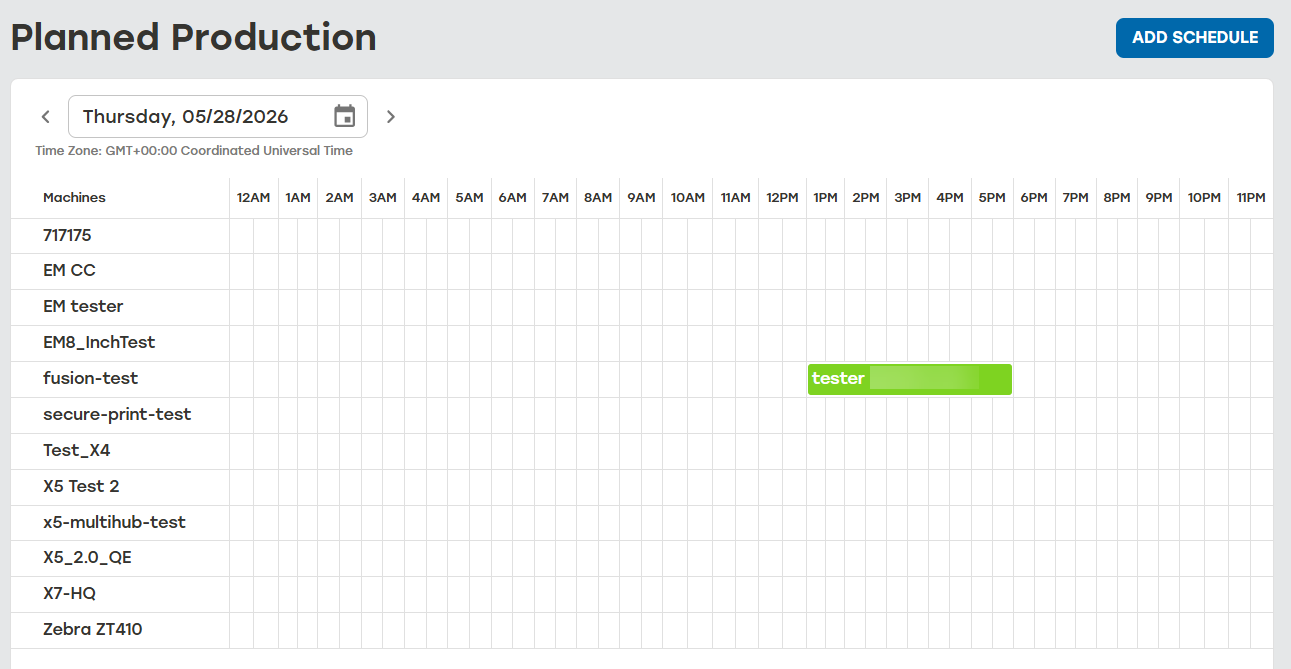
The Planned Production Grid displays all the scheduled Planned Production. The date at the top of the Planned Production Grid shows the date when the production is scheduled to take place. The Machines column lists all the machines available in the tenant.
 |
Add Planned Production
Go to the Planned Production page.
Select the arrows to choose the date for the schedule. Users can go to the current date by selecting today.
To schedule production, select and drag the time to the right of the desired machine. Scheduled productions can be updated by dragging them to the desired time slot.
Select the Planned Production entry.
Enter information for the Planned Production as needed:
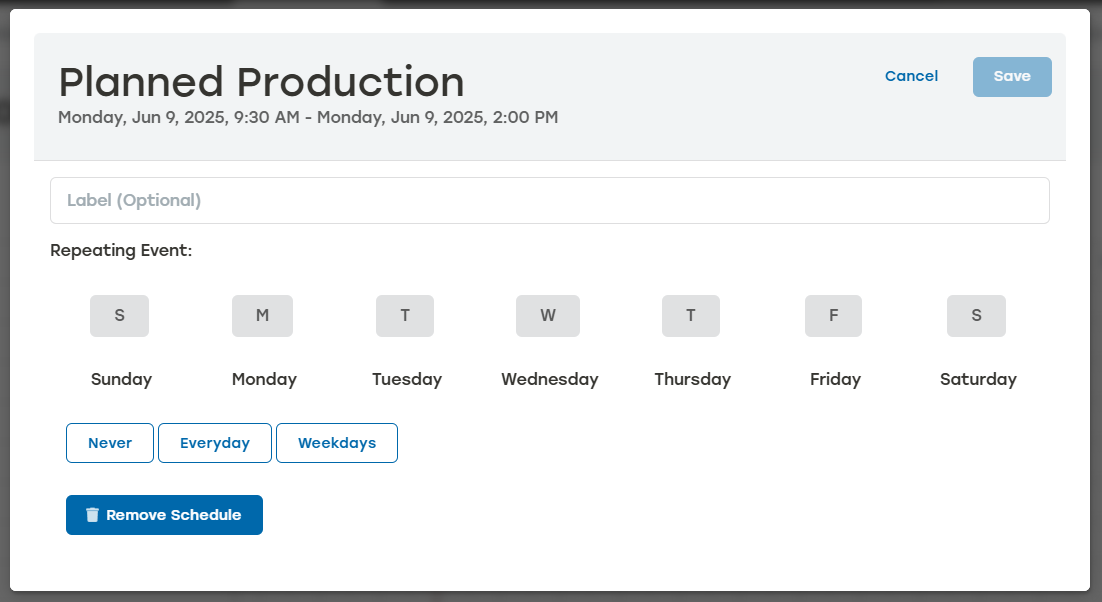
Label: This is added to the Planned Production title in parenthesis.
Repeating Event: Select when this Planned Production repeats by either selecting specific days, Everyday, or Weekdays. To remove the Repeating Event, select Never.
Select Save.
Edit Planned Production
Planned Production entries can be edited at any time. Historical entries should be edited to reflect any planned downtime or instances when the machine was not in use that weren't captured initially. Making changes to a recurring entry will apply those changes to every entry in the series, including all historical and future entries.
Go to the Planned Production page.
Identify the Planned Production entry to be edited.
Update the scheduled production time by dragging it to the desired time slot.
Select the Planned Production entry.
Make changes as needed.
Select Save.
When the Planned Production event is recurring, a dialog asking to confirm the change will appear. Select Confirm.
Delete Planned Production
Planned Production entries can be removed from the schedule. Historical entries can be removed retroactively. Deleting a recurring Planned Production entry will delete all entries in the series from the schedule.
Go to the Planned Production page.
Select the Planned Production event to be deleted.
Select Remove Schedule.
When the Planned Production event is recurring, a dialog asking to confirm the deletion will appear. Select Confirm.
Make sure that the deleted Planned Production schedule no longer appears on the Planned Production page.