Production Groups
Production Groups are logical groupings of machine groups within PackNet. Putting machine groups together in a production group lets the PackNet software send work to a single production group, where the workload is routed based on the selection rules and configurations in the production group setup. This increases speed and efficiency and reduces waste.
Each machine group can only be assigned to one production group.
Add Production Groups
On the Production Groups page, select the Add New button.
Enter the information as needed.
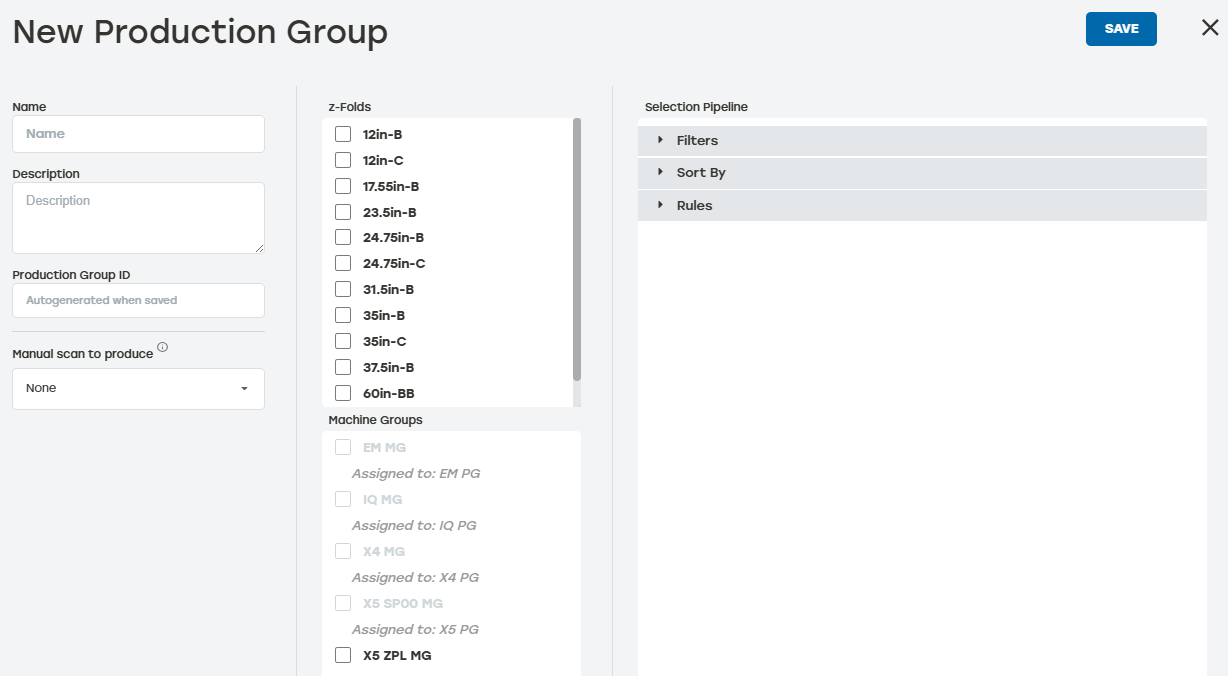
Name: This should be something that clearly identifies which production group this is (i.e., PG X5).
Description: This is not required but is helpful when users have more than one of the same machines in their system.
Manual scan to produce: This option turns on the scan to create or scan to trigger feature for this production group. The By released For Production filter must be enabled for this configuration to work.
z-Folds: This selects which z-Folds are available to be used by the machines in that production group. The available z-Folds are defined on the Materials tab. See Materials for more information.
Machine Groups: This selects which machine groups will be assigned to this production group.
Selection Pipeline: This allows users to configure rules about work is produced in this production group. See Selection Pipeline for more information.
When done, select Save.
Selection Pipeline
When creating or editing a production group, users can configure many rules about how work is produced. These options are organized into Filters, Sort By, and Rules.
Filters
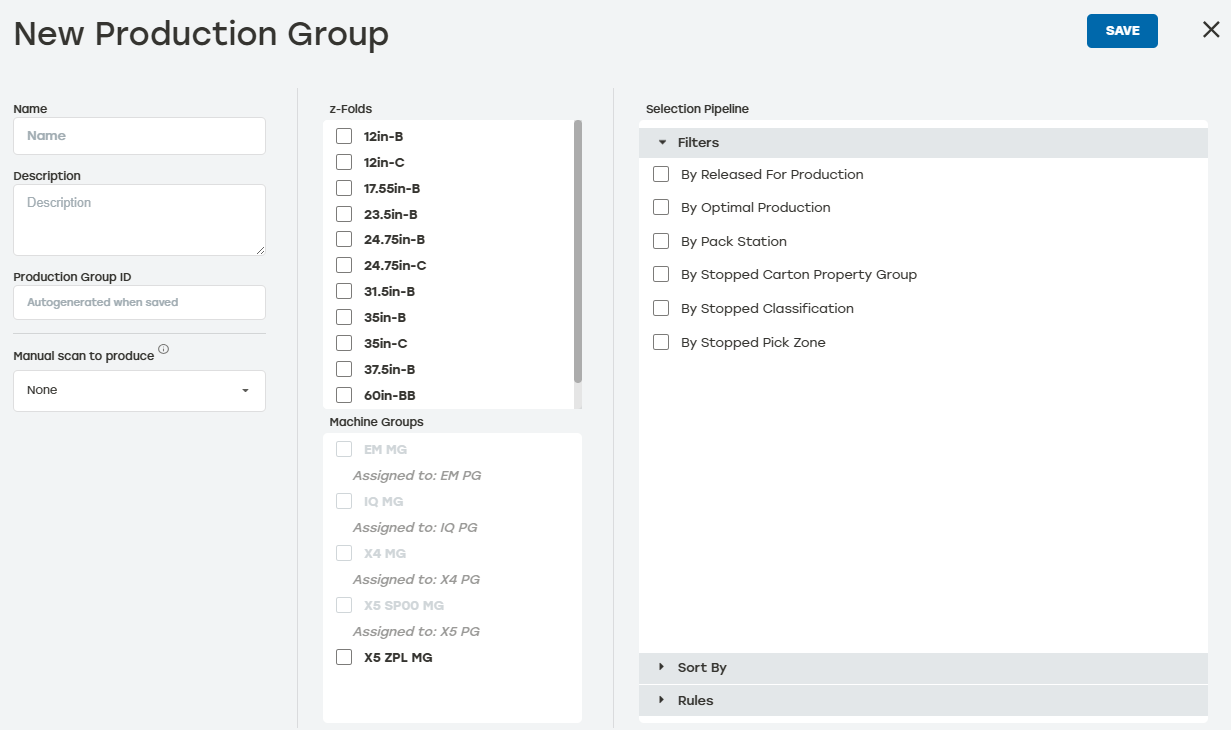 |
By Released For Production: Makes work that has not been released ineligible for selection. This is used when creating Box Last or Just in time scenarios where a trigger is signaling work to be produced. This setting requires the Import Pipeline to be configured with Wait for Trigger.
By Optimal Production: Packsize machines are always optimized to the smallest bale width that minimizes waste, but sometimes this restricts customer throughput by requiring bale changes or holding work for the machine with the correct bale. This option makes work ineligible that can not be produced on the machine optimally (the configured bale that can be used to yield the absolute least waste). This should be configured for most customers as it keeps the trim and waste to a minimum. When disabled, PackNet will optimize work to any bale on which it can produce, essentially prioritizing speed of production and throughput over trim and waste. Optimal production can also be disabled for specific packaging solutions in the import pipeline.
By Pack Station: This setting makes work ineligible that is not specifically assigned to the pack stations associated with the machine group making the selection request. This also requires that import pipelines assign a required pack station in the Location field or a trigger to be used to assign location to a pack station.
By Stopped Carton Property Group: When a carton property group (CPG) is set to Stopped in the dashboard, the work assigned to that CPG will be made ineligible for production.
By Stopped Classification: When a classification is set to Stopped in the dashboard, the work assigned to that classification will be made ineligible for production.
By Stopped Pick Zone: When a pick zone is set to Stopped in the dashboard, the work assigned to that pick zone will be made ineligible for production.
Sort By
The Sort By list can be organized in order of importance. As the user selects each item, the item is automatically moved to the top of the list. Selecting and deselecting each item allows for the list to be configured in the preferred priority.
Note
All work is first sorted by the top item in the list. When multiple items are selected, the configured sorts will behave as a “then by” sort. This means that items within the initial sort will be sorted within that context.
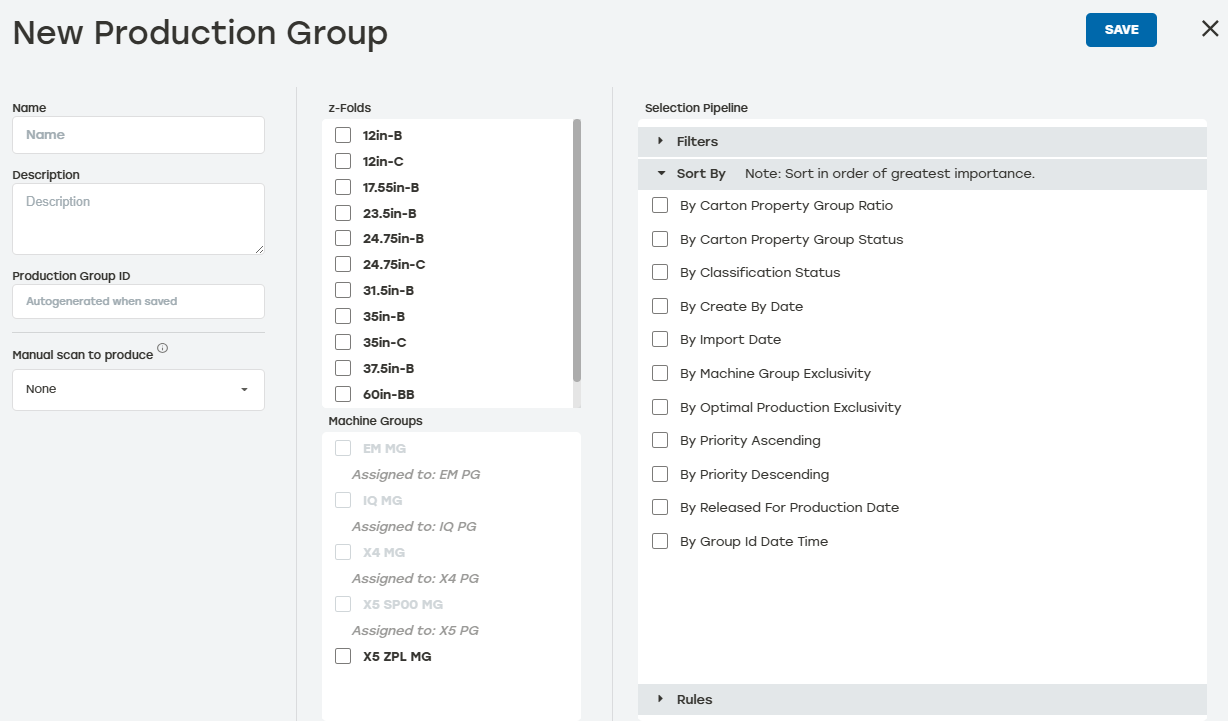 |
By Carton Property Group Ratio: Carton Property Groups (CPGs) can have a ratio configured that will apply to the jobs being produced. When the ratio is higher than other jobs, it will be prioritized in the system.
By Carton Property Group Status: CPGs can be in the Normal, Surge, or Stop states. These states control the work associated with the CPG. When this sort is applied, it will prioritize the CPGs in the system with the Surge state first, then the Normal state last. Stop is ignored in this step and controlled by the By Stopped Carton Property Group filter.
By Classification Status: Classifications can be in the Expedite, Normal, Last or Stop states. These states control the work associated with the classification. When this sort is applied, it will prioritize the work by the assigned classifications in the system with the Expedite state first, then the Normal state, then the Last state. Stop is ignored in this step and controlled by the By Stopped Classification filter.
By Create By Date: This sorts the work by the assigned create by date, prioritizing work that has an earlier date. This requires the Import Pipeline set the Create By Date for each carton
By Import Date: This sorts the work by prioritizing the oldest work imported first. This is useful for scenarios where customers would like a “first in, first out” behavior.
By Machine Group Exclusivity: Exclusivity is the concept that some work can only be exclusively created on a single machine group. This may be because it is the only machine group with a specific machine type. There will be some work in the system that can be exclusively produced on that machine group. This filter prioritizes Exclusive work first, as it can benefit the overall throughput of the system.
By Optimal Production Exclusivity: Exclusivity is the concept that work is to be produced on material that is currently only loaded on a single machine. This means that there will be some work in the system that can be exclusively produced on that machine group. This filter prioritizes Exclusive work first, as it can benefit the overall throughput of the system.
By Priority Ascending: Work with a higher assigned priority will be produced first.
By Priority Descending: Work with a higher assigned priority will be produced last.
By Release For Production Date: When work is released for production, it will also be assigned a date. This will prioritize the earliest released items first.
By Group Id Date Time: This sort will prioritize work with the same GroupId based on the time when the first package with a unique GroupId was imported with the earliest timestamp first. This will allow work with the same GroupId to be produced in close sequence without requiring a specific sequence during import. Work without a Group Id will be prioritized last. This requires the Import Pipeline to set xyz for the packages.
Rules
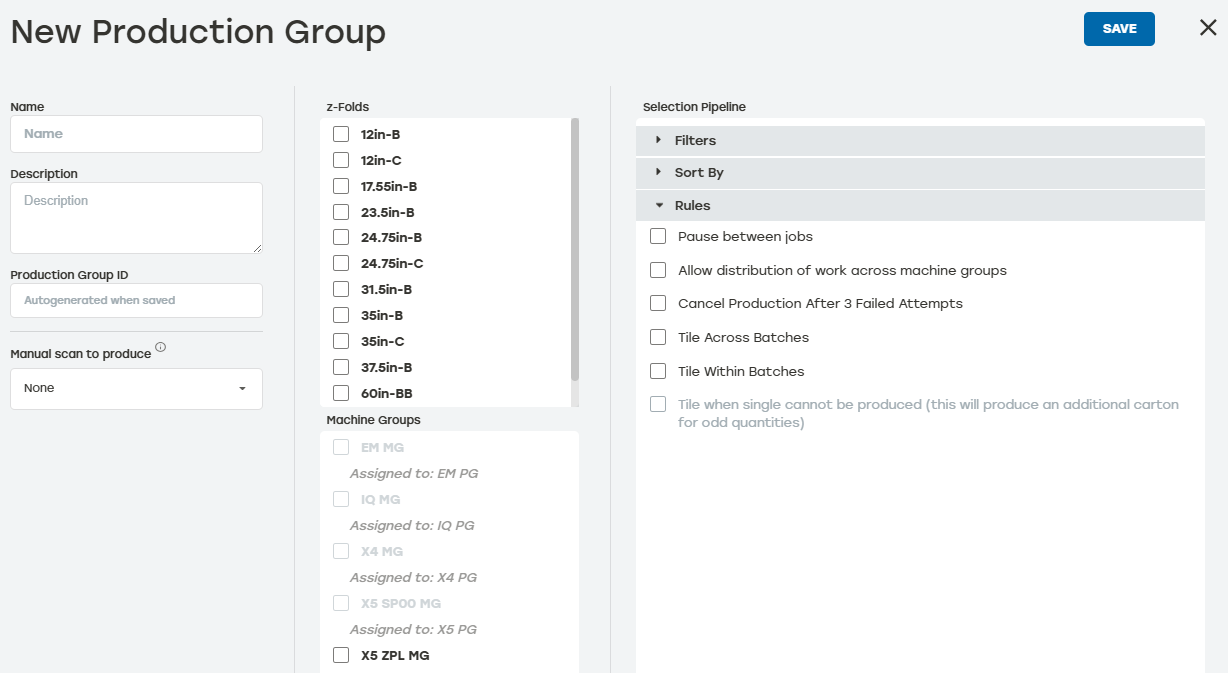 |
Pause between jobs: This causes the machine group to enter the pause state between every order or batch. The operator must put the machine group in play to resume production
Allow distribution of work across machine groups: When enabled and batches of work is used, this allows multiple machines to create the work together. This feature adds additional overhead to operators as they must understand where the work is being produced and reconcile the batch of work by gathering all the parts of the batch after production is completed. This is useful for customers that are running very large batches of work who need to produce the batches as fast as possible.
Cancel Production After 3 Failed Attempts: This will limit the number of times PackNet will try to reproduce a failed carton. Failed cartons will be detected on the machine and retried up to three times, afterwards the carton will then be marked as failed.
Tile Across Batches: This controls the tiling behavior in PackNet. When multiple batches are used, even when they are batches of one, this setting allows those items to be produced together in a tile set.
Tile Within Batches: This restricts the tiling behavior to only include items in a tile when they belong to the same batch of work. This keeps the batches of work together and makes it easier for the operator to reconcile the items in the batch.
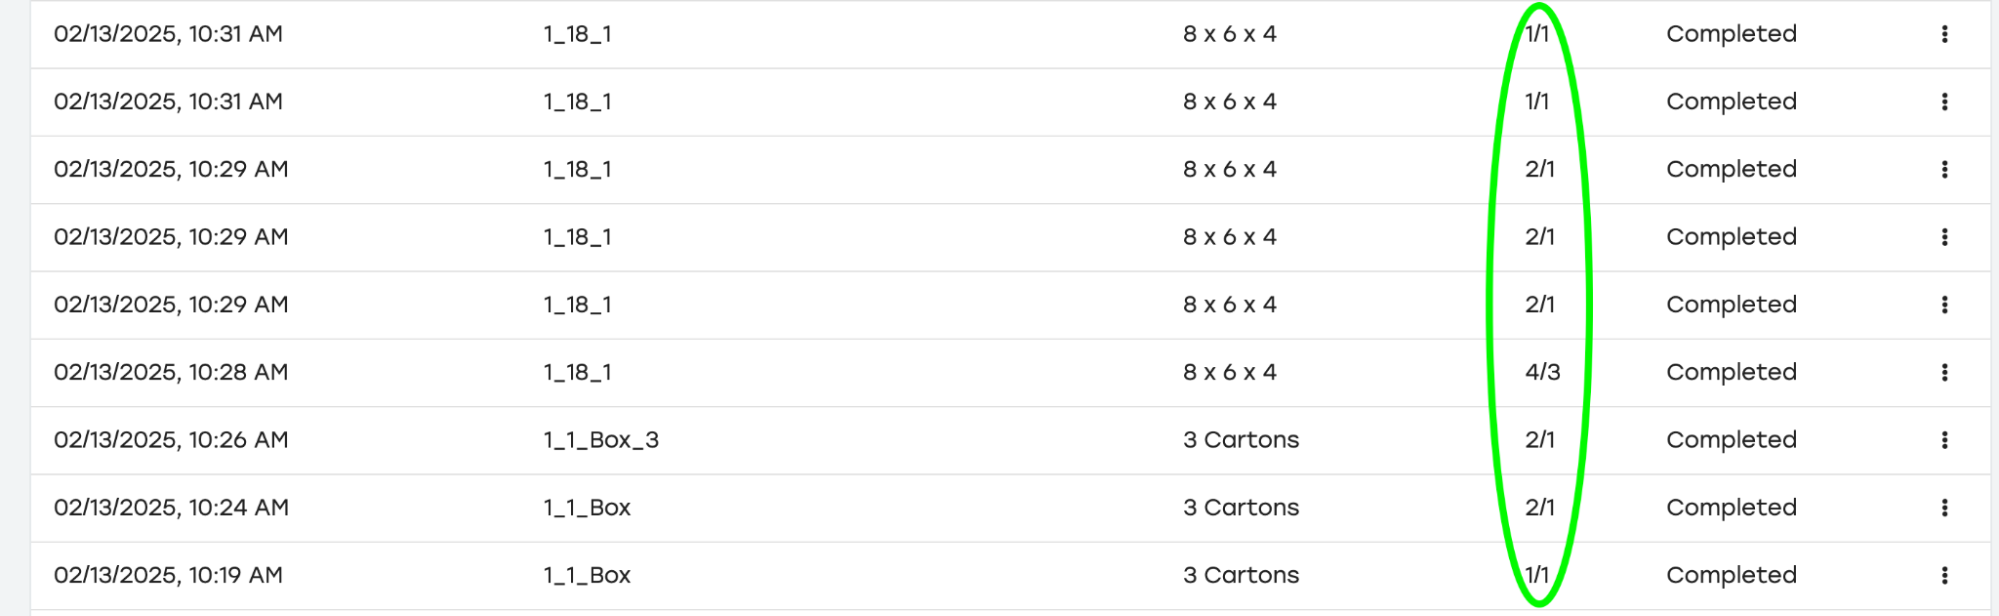
Tile when single cannot be produced: This rule supports production on the X4 when tiling. The X4 has physical limitations that can affect how carton production and tiling work. When the carton exceeds the X4's maximum allowed trim width, PackNet will not select this carton for production. This rule allows the work to proceed to production by creating an additional carton that makes the trim an acceptable width. When an additional carton is produced because of this rule, the job quantity will display in PackNet with a larger quantity than what was selected in Packaging Creation. Either Tile Across Batches or Tile Within Batches needs to be selected for this rule to be available.
Production Groups History
Go to the Production Groups page.
Select the history icon
 to the right of the desired production group to review the data.
Date: The date the entry happened
Type: The type of item listed in the entry
Activity: A brief description of the action
User: The PackNet user who completed the action
Select the arrow icon
 for a detailed view of the activity.
Select anywhere outside the Production Group History dialog to return to the Production Groups page.
Edit Production Groups
Go to the Production Groups page.
Select the edit icon
 to the right of the production group that needs to be edited.
Make changes as needed.
Select Save.
Delete Production Groups
Go to the Production Groups page.
Select the delete icon
 to the right of the production group that needs to be deleted.
A dialog will appear asking to confirm deletion. Select Yes.
Make sure that the deleted production group no longer appears on the Production Group page.